Products You May Like
Whether you’re new to weight training, getting reacquainted with your local gym, or simply looking for a change from the normal sets and reps, performing a solid finisher at the end of a workout helps you leave the weight room with confidence knowing you did exactly what you needed to do that day.
Cables and machines are especially great for burnout sets—particularly for big muscles like the lats. They allow you to isolate the targeted area, maximize the range of motion, and keep constant tension on the muscle. My burn out recommendation for lats? Simple: the single-arm lat pull-down.
Why the Single-Arm Lat Pull-Down?
Instead of the traditional lat pull-down, the single-arm variation lets you focus on stretching and then squeezing each side individually. Plenty of people who struggle to “feel” their back working during double-arm pull-downs find the single-arm variation gives them far more feedback and mind-muscle connection.
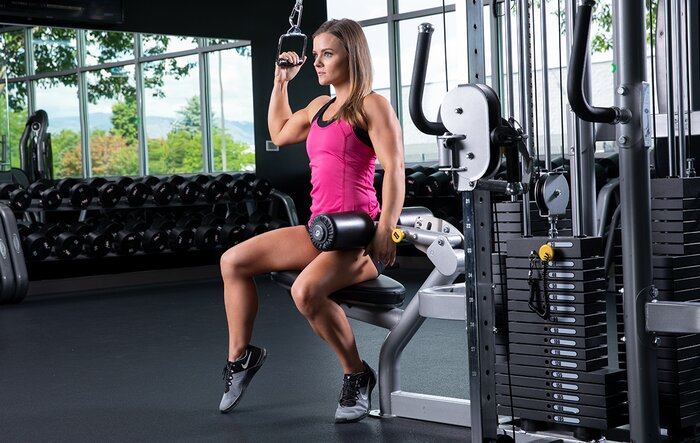
Another nice thing about it is you can perform it at a lat pull-down station or any cable stack with a single D-handle. Just set up a single handle cable attachment to the top pulley and pull up a bench or simply take a knee. If there’s a cam-based or plate-loaded pull-down machine in your gym that allows you to work each side individually, that will do the job just fine, as well.
Got your machine? Then let’s get to work.
The Warm-Up Set
There is only one warm-up set for this one-move meltdown, and it’s not necessarily for warming up. If you’re doing this meltdown at the end of your back workout, you’re plenty warm. Instead, the purpose of this set is to help determine the proper weight to use.
When you reach up to grab the handle, your entire arm should be straight up and down so that the working side of your back is directly underneath the handle. This will maximize the effectiveness of the pull.

Start with your weaker side. Pull the handle straight down and really focus on squeezing the lat. Slowly return to the starting position and repeat. Perform 10 reps with each side for this first set. Then, decide the weight that you think you can do for around 12 reps and get ready for your lat meltdown.
The Meltdown Set
Start with your weaker side again. Take 2 seconds to pull the handle down, squeeze the lat hard for a second, and take 2 seconds more to let the handle back up. Feel a full stretch at the top before initiating the next rep. All in all, each rep should take around 6 seconds from start to finish. The tempo of your rep should be 2-sec. positive, 1-sec. hold, 2-sec. negative, and 1-second stretch.
Do your best to reach 10 reps. If you happen to fail at 8, that’s OK. If you reach failure sooner than that, you went too heavy. Repeat the set with your stronger side using the same cadence and focus. Your goal should be to achieve the same number of reps that you did on the first side.
Here’s where it’s going to get real. As soon as you finish the last rep on the second side, immediately go back to the first side and get back to work with no rest. Perform the reps the same way you did the first time. You may be able to get close to the same number of reps that you did the first time, but expect to fall 1-2 reps short. Whenever you reach failure, make the other side work again without rest. The transition time should be absolutely minimal.
Now the real fun begins. Switch back to the starting side and start performing reps as you normally would with a normal cadence—no pauses or exaggerated slow lifting. The goal at this point is absolute failure. If you complete a rep, attempt another one.
When you reach failure, switch back to your other side and do the same. Your lats will be on fire, but push yourself. No one grows while staying in their comfort zone. Take this final set as far as you can until you reach failure. Here is what your one-move meltdown should look like:
One-Move Meltdown: Single-Arm Lat Pull-Down
- Warm-up: 10 reps with each side
- Phase 1: 8-10 reps with 2-1-2-1 tempo for both sides. (No rest)
- Phase 2: Reps until failure with 2-1-2-1 tempo for both sides. (No rest)
- Phase 3: Reps until failure at normal cadence with both sides.
Tips for Next Time
If you decide that you enjoy (or hate) this set and want to get better, you have two ways to do it. One is by performing more reps with the exact same weight. The other is to increase the weight you’re working with and trying to hit the same reps as the lighter weight. Either way you’re increasing the total volume you lift, which will help you improve regardless.
Week-by-week progress and improvement should be the secondary goal of using a burnout technique such as this. The primary goal? To give your lats a loud and clear message to grow.
Ready to earn that V-taper the hard way? Try 30-Day Back with Abel Albonetti. With three back workouts a week, it just might be toughest and most effective back specialization program on the planet.
